안티바이러스나 온라인 보안 애플리케이션과 함께 ExpressVPN 앱을 실행 시 DNS 유출 문제를 해결하는 방법을 안내합니다.
ExpressVPN에 연결되면, 귀하의 장치는 ExpressVPN의 보안 DNS 서버를 사용하여 DNS 쿼리를 실행합니다.
ExpressVPN 앱을 Norton 360과 Avast 같은 안티바이러스 또는 온라인 보안 애플리케이션과 함께 사용하면, 안티바이러스 또는 온라인 보안 애플리케이션이 ExpressVPN 앱을 방해하고 귀하의 장치가 ExpressVPN의 DNS 서버를 사용하지 않도록 지시할 수 있습니다. 이로 인해 DNS 유출이 발생할 수 있습니다.
이 문제를 해결하려면 아래 단계를 따르십시오. 각 단계 후, 문제가 해결되었는지 확인하기 위해 유출 테스트를 실행하십시오. 문제가 해결된 경우 나머지 단계를 건너뛰어도 됩니다.
계속 진행하기 전에 최신 버전의 ExpressVPN Windows 앱을 사용 중인지 확인하십시오.
이동…
1. 안티바이러스나 온라인 보안 애플리케이션의 브라우저 확장 프로그램 및 DNS 또는 웹 필터링을 비활성화하십시오
2. DNS가 자동으로 설정되어 있는지 확인하십시오
3. ExpressVPN 앱 설정을 확인하십시오
1. 안티바이러스나 온라인 보안 애플리케이션의 브라우저 확장 프로그램 및 DNS 또는 웹 필터링 기능을 비활성화하십시오
ExpressVPN 앱에 간섭할 수 있는 안티바이러스나 온라인 보안 애플리케이션과 관련된 브라우저 확장 프로그램을 모두 비활성화하십시오. (이는 귀하의 안티바이러스나 온라인 보안 애플리케이션의 성능에 영향을 미치지 않습니다.) 기기가 오직 ExpressVPN의 DNS 서버만 사용하도록 안티바이러스나 온라인 보안 애플리케이션의 DNS 또는 웹 필터링 기능을 비활성화하십시오.
각 안티바이러스 또는 온라인 보안 제품은 DNS 또는 웹 필터링 기능에 대해 다른 이름을 사용할 수 있습니다. 구체적인 지침은 안티바이러스나 온라인 보안 애플리케이션 공급자에게 문의하십시오.
도움이 필요하세요? 즉각적인 지원이 필요하면 ExpressVPN 지원팀에 문의하십시오.
2. DNS가 자동으로 설정되어 있는지 확인하십시오
- Windows 실행 명령을 엽니다.
- ncpa.cpl를 입력하고 확인을 클릭하십시오.
- 네트워크 연결 창에서, 활성화된 인터넷 연결을 우클릭하십시오.
- 속성을 선택하세요.
- 인터넷 프로토콜 버전 4 (TCP/IPv4) 또는 인터넷 프로토콜 버전 4 (TCP/IPv6) (체크된 항목)을 더블 클릭하십시오.
- DNS 서버 주소를 자동으로 받음을 선택하십시오.
- 확인을 클릭하세요.
도움이 필요하세요? 즉각적인 지원이 필요하면 ExpressVPN 지원팀에 문의하십시오.
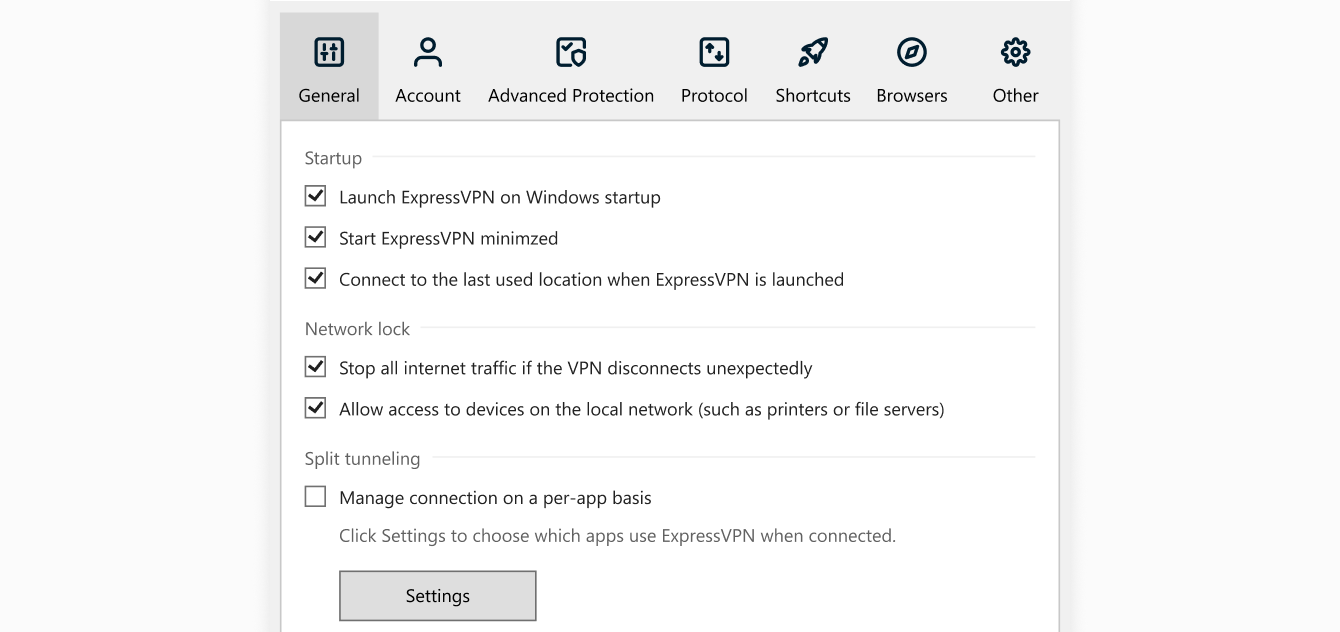
3. ExpressVPN 앱 설정을 확인하십시오
- ExpressVPN 앱에서,

 > 옵션 > 일반을 클릭하십시오.
 - Network Lock 두 개의 박스가 체크되어 있는지 확인하십시오.


- 애플리케이션별로 연결 관리가 체크되어 있지 않은 것을 확인하십시오.
- 확인을 클릭하세요.
도움이 필요하세요? 즉각적인 지원이 필요하면 ExpressVPN 지원팀에 문의하십시오.